Getting started with Standard Red Notes
Welcome! This is a friendly guide to using Standard Red Notes day to day. If you’re here to set up your own server instead, see docs/self-hosting.md — this guide assumes you already have an instance to sign in to (your own, or one someone runs for you).
- What this is
- First steps
- The basics
- Editors
- Organizing and navigating
- Power features
- Security: what leaves your device
- Tips and keyboard shortcuts
- Getting help
What this is
Standard Red Notes is a private, end-to-end encrypted notes app. Your notes are encrypted on your device before they’re synced, so only you — using your password — can read them. The server stores ciphertext it cannot decrypt.
It’s an open, AGPL-3.0 licensed self-hosted fork of Standard Notes. That means you (or whoever runs your server) own the data and the infrastructure, and the full feature set is included by default — there’s no subscription or upgrade to unlock things.
Want to run your own server? The self-hosting guide walks through a 5-minute Docker setup, every configuration option, backups, and troubleshooting. The rest of this guide is about using the app once you can reach it.
First steps
Create an account or sign in
- Open your instance in a browser (a default local install lives at
http://localhost:3001). - Choose Register to create a new account, or Sign in if you already have one.
- If you’re connecting to a non-default server, expand the advanced options on the sign-in screen and set the sync server to your instance’s URL.
That’s it — there’s nothing to purchase. Self-hosted instances ship with all features included.
Your password matters — a lot
Because notes are end-to-end encrypted, your password participates in deriving the keys to your data. The server never receives the plaintext password and an administrator cannot choose a new password and decrypt the account for you.
- Choose a strong password and store it somewhere safe (a password manager is ideal).
- Make regular encrypted backups (see Import / export) so you always have a copy you control.
- If you want the shipped optional account-recovery flow, enable it before the password is lost and save the separately generated recovery code.
Some servers may have a shared Server Access Key configured (an obfuscation gate the operator sets). If yours does, enter it under Preferences -> Security -> Server Access Key before signing in. It is stored only on that device and is separate from your account password.
Enable optional account recovery
Account recovery is available under Preferences -> Security -> Account recovery and is off by default. Enabling it requires the current password. The client creates a high-entropy recovery code, encrypts the account root-key material with it, and uploads only that ciphertext escrow. The code is shown once and never sent to the server.
- Enable recovery while signed in and on a trusted computer.
- Save the entire code in a protected password manager or offline recovery package, separate from the notes account and the only backup.
- If you lose the password, choose Recover account with an account recovery code from the signed-out screen, enter a strong replacement password, and save the newly rotated recovery code.
- Replace the code immediately if it may have been copied. Replacing it or completing recovery invalidates the old code; changing the account password deletes the existing escrow and requires a new opt-in.
The basics
Creating and editing notes
- Click Create new note (the pencil/plus button) to start a note. Type a title and start writing — changes save and sync automatically.
- The note list sits between your navigation sidebar and the editor. Use the options at the top of the list to change sort order (by date modified, created, or title) and what’s displayed.
The list header keeps its highest-frequency actions together.
- Create a note from the red plus button.
- Search the current note collection.
- Use the visible Add a quick action control.
Finding things
- Search the note list with the search field at the top of the list. It matches titles and content. (Optionally, a faster local search index and an AI-style local relevance ranking can be enabled in Preferences -> Assistant -> Search — both run entirely in your browser.)
The crop below shows the visible, empty Search input and the unfiltered seeded note list. It does not show an entered query, filtered results, relevance ranking, or a no-results state.
The visible Search field is empty and the seeded list is unfiltered; no active query, filtered results, ranking, or no-results state is depicted.
- The visible Search input is empty; no query has been entered.
- The highlighted seeded row is visible in the unfiltered note list.
Organizing single notes
From a note’s options menu (the “…” / context menu) you can:
- Pin a note to keep it at the top of the list.
- Star / favorite it.
- Archive it to get it out of the main list without deleting it.
- Move to Trash, then later restore it or empty the trash to delete permanently.
- Protect it (see Power features).
The navigation sidebar has built-in smart views for Notes, Starred, Archived, and Trash.
The crop below proves only the visible LINKS, Linked items, and closed Note options entry points. The menu and panel are not open, so it does not show or prove pin, star, archive, trash, restore, protect, or relationship actions.
The stored crop proves only the visible Links, Linked items, and closed Note options entry points; no panel, menu, or note action is open.
- The visible LINKS text is an entry point; no linked-items state is open.
- The Linked items button is visible, but its panel is closed.
- The Note options button is visible, but its menu and actions are closed.
Editors
Each note uses an editor. The two main ones:
Plain text
A clean, distraction-free plain-text editor. Fast, lightweight, and perfect for quick notes, code snippets, and anything where you want full control over the raw text.
Super (rich blocks)
Super is the rich block editor. Type / in a Super note to open the block
picker and insert things like:
- Checklists and to-do items
- Tables
- Kanban boards
- Math (inline and block equations)
- Code blocks with syntax highlighting
- Embeds and web embeds
- Canvas / drawings (sketch diagrams directly in a note)
- Headings, quotes, dividers, collapsible sections, and more
There is also a dedicated Canvas editor for notes that are primarily a freeform drawing surface.
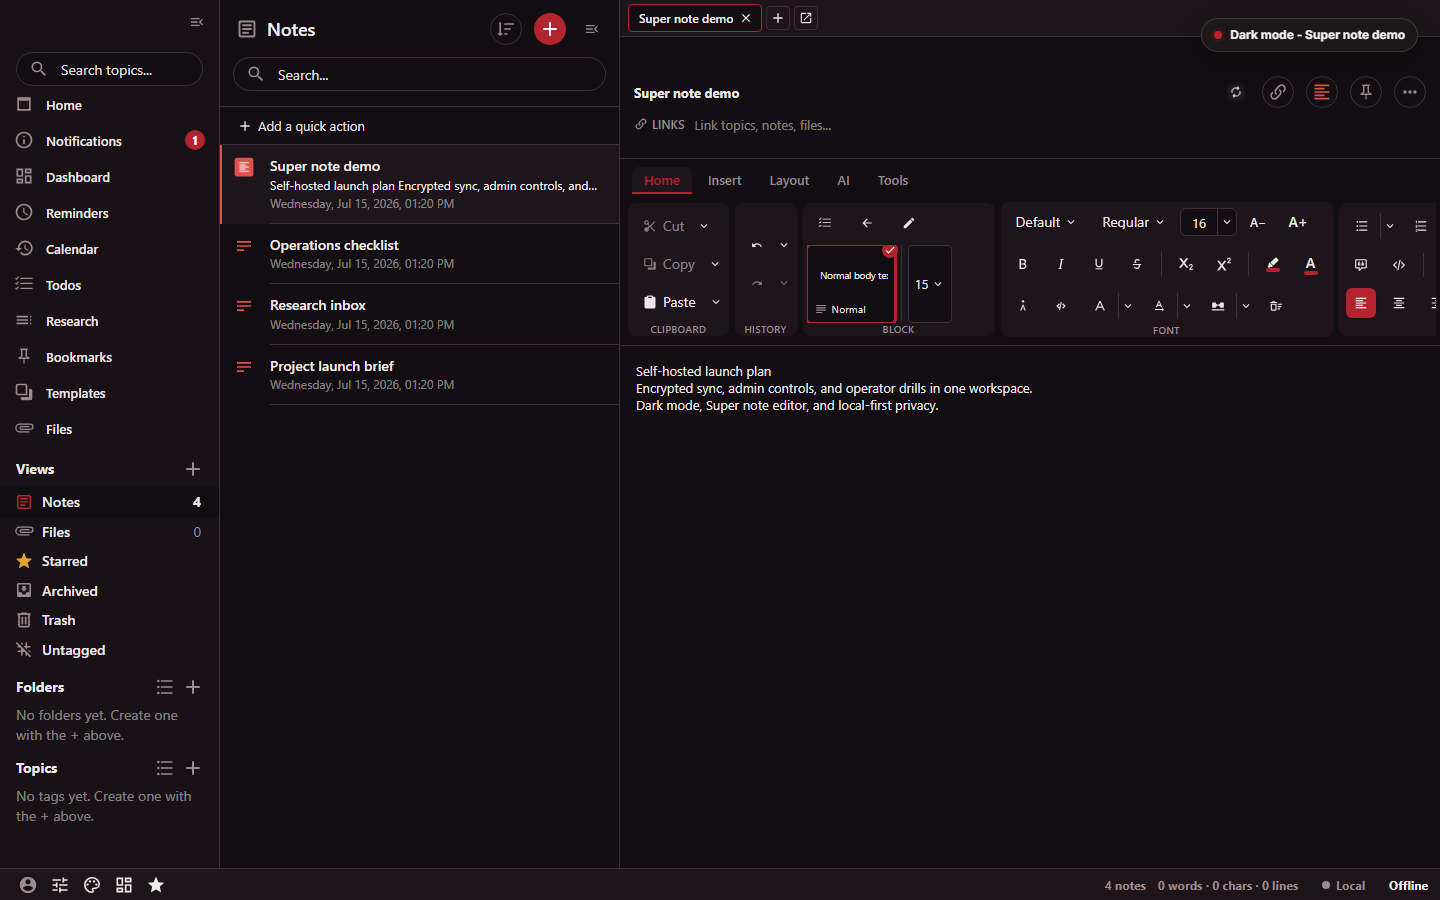
The crop below proves only that a Super note is open and the Home, AI, and Tools ribbon tabs are visible. It does not show the slash block picker, any inserted block type, or the contents or behavior of the AI and Tools tabs.
The stored pixels show an open Super note and the Home, AI, and Tools tab labels; they do not show the block picker, inserted block types, or tab behavior.
- The visible Home ribbon tab is selected.
- The visible AI tab is closed; its actions are not shown.
- The visible Tools tab is closed; its utilities are not shown.
Some web embeds won’t display: many sites refuse to be shown inside another page (via
X-Frame-Options/ frame-ancestors), so those embeds will show a link or placeholder instead of the live site. That’s a restriction set by the embedded site, not by Standard Red Notes.
Switching editors per note
The editor is chosen per note. Open the editor menu for a note (the editor/format selector in the note’s options) and pick Plain, Super, Canvas, or any other available editor. You can change a note’s editor at any time.
Organizing and navigating
Folders vs tags
Standard Red Notes gives you both, and they’re different on purpose:
- Tags are flexible labels. A note can have many tags, and tags can be
nested into subtags. Great for cross-cutting themes (
#idea,#work,#recipe). - Folders are a more familiar hierarchical structure, and support subfolders. Great when you think in terms of “one place this belongs.”
Use whichever model fits how you think — or mix them.
The crop below shows the empty Folders and Topics sections, including their headings, add controls, and empty-state text. It does not show populated folders, nested subfolders, populated topics, subtags, or notes organized by either structure.
The stored crop shows empty Folders and Topics sections, their empty-state text, and visible add controls; it does not depict populated or nested organization.
- The empty Folders heading is visible; no folder rows are present.
- The visible plus control is the closed create-folder entry point.
- The visible plus control is the closed create-topic entry point.
Note links and backlinks
You can link notes to each other. While editing, reference another note (in Super, start a link from the toolbar or block menu; everywhere, use the linked items panel on a note). The linked note then shows a backlink to the note that points at it, so you can navigate the web of connections in both directions.
The constellation graph
The constellation view visualizes your notes and their links as an interactive graph — a “star map” of how everything connects. It’s a great way to rediscover related notes and spot clusters of related ideas. Open it from the footer or the command palette.
The command palette
Press Ctrl/Cmd + Shift + ; to open the command palette — a fast, keyboard-driven way to jump to notes, run actions, switch views, and trigger features without hunting through menus. Start typing and it fuzzy-matches what you want.
Collapsible sidebars
Both the navigation sidebar and the note list can be collapsed to give the editor more room. Collapse them when you want to focus, expand them when you want to browse.
The upper sidebar keeps topic search and named workspace destinations together.
- Use the visible Search topics field.
- Open the visible Reminders workspace shortcut.
Power features
The AI assistant
Standard Red Notes includes an optional AI assistant. You configure it in Preferences -> Assistant to talk either directly to an OpenAI-compatible endpoint (local options like LM Studio or Ollama, or hosted ones like OpenAI / OpenRouter) or through your server as a proxy.
When you chat, you choose a context scope — the current note, your whole notebook, or a specific collection (a tag, a folder, or hand-picked notes) — so the assistant only sees what you point it at. It can also confirm before making write changes to your data (on by default).
Note narration (text-to-speech)
From a note’s options menu, Narrate the note: the assistant rewrites it into clean, listenable prose and a player reads it aloud. Playback can use model voices (when a Direct AI endpoint is configured) or your device’s built-in voices (browser text-to-speech, no network or key required).
Device voices vary: which voices and languages are available depends on your operating system and browser, so the same note can sound different on different machines. The alert above describes the separate narration-rewrite data path.
Protected notes
Mark a note as protected to require re-authentication (your password or biometrics, depending on platform) before it can be viewed or edited. Good for your most sensitive notes so a glance at an unlocked app doesn’t reveal them.
Selective sync (local-only notes)
You can mark a note as local-only before its first sync so it stays on the current device and is never uploaded to the server. This is a pre-upload privacy choice: after a note has synced, the control is disabled because stopping future uploads cannot retract the encrypted copy already stored by the server. Use it for new scratch notes or device-specific content, and back those notes up yourself.
Themes (auto light/dark)
In Preferences -> Appearance choose your color scheme: Auto (follows your system’s light/dark setting), Light, or Dark. Additional themes are available too. Auto falls back to Dark when your system preference can’t be determined.
Import / export
In Preferences -> Backups / Data you can:
- Export an encrypted backup (recommended — only you can open it), decrypted backup, or plaintext.
- Import notes from a backup or from other apps’ export formats.
Make backups regularly. An encrypted backup protects against device or server loss only while you retain its password. Optional account recovery helps only when it was enabled in advance and its separate code still exists. Otherwise, recovering after a forgotten password requires an independently usable copy, such as a carefully protected decrypted export or an encrypted export whose password you still know.
Security: what leaves your device
End-to-end encryption means your note content is encrypted locally and the server only ever stores ciphertext it can’t read. A few features intentionally cross that boundary — here’s an honest summary so there are no surprises:
| Action | What happens to the E2E boundary |
|---|---|
| Normal notes & sync | Content is encrypted on-device; the server stores ciphertext only. Your password is never sent. |
| The AI assistant / narration | Notes are decrypted locally, but the content you point the assistant at is sent to the AI provider you configure. Cloud providers see that content; local models keep it on your machine. |
| Sharing / collaboration | Anyone you share with can read what you share — that content is, by design, no longer private to you alone. |
| Server Access Key | An operator-set obfuscation gate, not encryption. It makes the server refuse clients that don’t present the key; it does not strengthen (or replace) end-to-end encryption. |
| Decrypted / plaintext export | The file is unencrypted — anyone who gets the file can read it. Prefer encrypted backups. |
| Local-only (selective sync) | When enabled before first sync, the note never leaves the device — but it also isn’t backed up to the server, so back it up yourself. It cannot be newly enabled after upload. |
| Optional account recovery | The client uploads root-key material encrypted by a separate high-entropy recovery code. The server cannot decrypt it, but anyone with the code can fetch and decrypt the escrow offline; MFA does not protect a copied code. |
The takeaway: your notes are private by default. Each feature above is a deliberate, opt-in trade-off — use them knowingly.
Tips and keyboard shortcuts
- Ctrl/Cmd + Shift + ; — open the command palette.
- Ctrl/Cmd + / — open the keyboard shortcuts reference (the fastest way to learn the rest).
- Type
/in a Super note to insert blocks (checklists, tables, kanban, math, code, canvas, embeds…). - Pin the notes you return to most so they stay at the top.
- Use tags for cross-cutting themes and folders for “where it lives” — you can use both.
- Make a protected note for your most sensitive content.
- Prefer a local AI model (LM Studio / Ollama) if you want assistant features without sending content to a cloud provider.
- Export an encrypted backup before any big change or migration.
Getting help
- Keyboard shortcuts: press Ctrl/Cmd + / in the app.
- Running your own server: see the self-hosting guide.
- Bugs / feature requests: open an issue on the project’s repository.
Because Standard Red Notes is AGPL-3.0 and self-hostable, you’re always in control of your data and free to inspect, modify, and run the software yourself. Happy note-taking!